

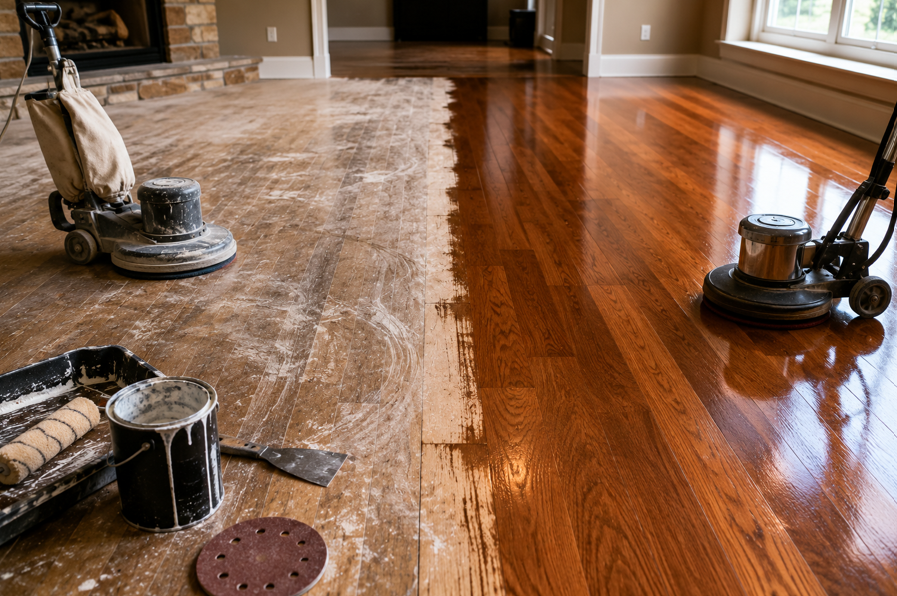
Hardwood floors can look completely different after a well-planned refinishing project. Scratches fade, worn traffic lanes disappear, and a dated stain can give way to a cleaner, more current finish. That transformation makes refinishing look tempting as a do-it-yourself project, especially when online videos compress several days of work into a few polished minutes.
The reality is more detailed. Successful refinishing depends on correctly identifying the floor, checking its condition, controlling dust, sanding evenly, choosing compatible products, and allowing each coat enough time to dry and cure. A mistake in any one of those areas can leave permanent marks or create a finish that wears out sooner than expected.
At Brücke Flooring, we take a straightforward approach to hardwood care. Some homeowners are comfortable handling light maintenance or a small cosmetic repair. Full refinishing, however, often calls for professional equipment, product knowledge, and the ability to recognize problems before sanding begins.
This guide explains the most common refinishing mistakes DIYers make, why they happen, and how experienced Tulsa flooring professionals avoid them.
Mistake 1: Refinishing a Floor That Is Not Ready
The first mistake often happens before a sander enters the room. A homeowner sees scratches, dullness, or discoloration and assumes the floor is ready for refinishing. Those symptoms may be surface problems, but they can also sit alongside moisture, loose boards, damaged subflooring, deep stains, or a floor that has already been sanded several times.
Why DIYers Miss the Warning Signs
Wear can hide important details. Dark areas may be old stain, pet damage, water exposure, or finish failure. Gaps may reflect normal seasonal movement, but wider or irregular gaps can point to installation or moisture concerns. Cupping, crowning, softness, and movement all need investigation before the surface is altered.
Engineered hardwood creates another challenge. Some products have a thick enough wear layer for refinishing, while others do not. Sanding through a thin veneer can expose the core and permanently damage the plank.
How Professionals Avoid It
A professional begins with an assessment rather than a sanding schedule. The floor is reviewed for species, construction, thickness, previous refinishing, moisture concerns, damaged boards, movement, and finish type. Areas around exterior doors, plumbing, kitchens, pet spaces, and older repairs receive extra attention.
When moisture is involved, the floor needs time to stabilize before sanding. When boards are too thin, replacement or a less aggressive renewal method may be safer.
Mistake 2: Skipping Repairs Before Sanding
Sanding does not repair loose boards, broken tongues, deep cracks, protruding fasteners, or unstable patches. It can make some of these problems more obvious.
A loose board may vibrate under sanding equipment, creating uneven marks. Raised nails or staples can tear abrasive paper and damage machinery. Deep gaps may collect filler that later cracks as the wood moves. Severely stained or split boards can remain visible after the surrounding surface looks new.
Professionals identify repair areas first. Loose boards can be secured, damaged sections can be replaced, and fasteners can be set below the sanding path. Repairs are planned with the wood species, board width, grain, and surrounding color in mind.
Not every gap needs filler, and not every imperfect board needs replacement. Experienced judgment helps preserve the floor’s character while correcting defects that would affect performance or appearance.
Mistake 3: Using Sanding Equipment Without Enough Control
Rental sanders make professional refinishing tools available to homeowners, but access to a machine is not the same as experience using it.
Large drum or belt sanders remove material quickly. Pausing in one place, lowering the drum too early, turning unevenly, or moving at an inconsistent pace can create deep grooves. An edger can leave circular scratches or a visible picture-frame effect around the room when the perimeter does not blend with the center.
These marks often become more noticeable after stain is applied. An overly aggressive pass can also remove more wood than necessary, reducing the number of times the floor can be refinished in the future.
Professionals match the machine, abrasive grit, and sanding direction to the floor. They keep equipment moving at a controlled pace, blend edge work with the main field, and inspect the surface between passes. The goal is not to remove as much wood as possible. It is to remove only what is needed for a flat, consistent surface.
Mistake 4: Choosing the Wrong Sandpaper Sequence
Coarse grit can remove old finish quickly, but it can also leave scratches that require several additional passes to correct.
Each sanding stage needs to remove the marks left by the previous grit. Jumping too far between grits can leave lines that show through stain and finish. Beginning too aggressively may remove extra material and create uneven color absorption.
The correct starting point depends on the finish, species, flatness, and condition of the floor. Professionals test the surface, choose the least aggressive grit that will work effectively, and progress in controlled steps. Edges, corners, and the open floor are brought to a similar level of smoothness so stain absorbs more evenly.
Mistake 5: Sanding Against the Grain or Unevenly
Wood grain influences how sanding marks appear. Moving carelessly across the grain can create visible scratches, especially during later passes.
DIYers may follow the easiest path through the room rather than the correct sanding direction. They may overlap some areas too much, miss others, or tilt the machine while turning. Corners and narrow spaces often receive a different amount of sanding from the open floor.
Professionals plan the room before starting. They consider plank direction, room shape, natural light, transitions, and difficult areas. Each pass follows a consistent pattern with controlled overlap. Detail work is then completed around corners, thresholds, vents, stairs, and other tight areas.
Mistake 6: Underestimating Dust Control
Refinishing creates fine dust that can travel through doorways, air returns, cabinets, and adjoining rooms. It can also settle back onto the floor before finish is applied.
Dust on a wet finish can create bumps and rough patches. Dust in vents and nearby rooms increases cleanup and disruption, while airborne particles may affect sensitive household members.
Professional refinishing includes a dust-management plan. Equipment is connected to suitable collection systems, work areas are contained, and surfaces are cleaned between stages.
Brücke’s White Glove Treatment is especially relevant here. Professional hardwood floor refinishing is not only about changing the color of a floor. It is also about protecting the home, managing disruption, and leaving the work area ready for normal life again.
Mistake 7: Choosing a Stain From a Small Sample
A stain color can look appealing on a display card and completely different across a full room. Wood species, board variation, natural light, wall color, sanding quality, and finish sheen all affect the result.
Some woods absorb stain unevenly. Repairs may take color differently from original boards. Dark stains can highlight scratches, filler, and dust, while very light finishes may reveal natural variation that was less visible before.
Professionals create test areas on the actual floor whenever practical. Several options can be viewed in daylight and evening lighting. A test area also shows how the prepared wood accepts color before the whole room is committed.
Mistake 8: Applying Stain Unevenly
Stain needs consistent application and wiping. Working too slowly, leaving excess product, overlapping drying edges, or changing pressure can create lap marks and blotchy color.
Temperature, humidity, airflow, and room size can affect working time. A homeowner working alone may struggle to maintain a wet edge across a large open space.
Professionals organize the room, tools, product, and exit path before application starts. They work in manageable sections and follow the manufacturer’s directions for spreading, wiping, ventilation, and drying. They also recognize when a wood species or color choice needs additional preparation.
Mistake 9: Mixing Incompatible Products
Not every stain, sealer, and topcoat is designed to work together. Combining products without checking compatibility can lead to poor adhesion, extended drying, peeling, cloudiness, or uneven sheen.
Dry time and cure time are also different. A surface may feel dry but still be too soft for another coat, furniture, rugs, or normal foot traffic. Applying an overly thick coat can slow drying and leave a soft finish.
Professionals choose a compatible system based on the wood, desired appearance, household needs, and project schedule. Products are applied at the specified coverage, and each coat receives the required preparation and drying time.
Mistake 10: Choosing the Wrong Sheen
Gloss level changes both the appearance and practicality of a hardwood floor. High gloss reflects more light and creates a formal look, but it may also make dust, pet hair, scratches, and minor surface variation more noticeable.
Matte and satin finishes tend to create a softer appearance and can be more forgiving in active households. The right choice depends on natural light, pets, traffic, maintenance habits, and the style of the room.
Professionals explain how a sheen will look across a full floor rather than only on a small sample. The final choice balances appearance with everyday use.
Mistake 11: Rushing Drying and Curing Time
One of the most common DIY errors happens after the visible work seems complete. The finish feels dry, so furniture returns, rugs go down, and normal traffic resumes.
A finish can be dry enough for a light next step while still developing its full hardness. Heavy furniture, rugs, pet claws, cleaning products, and rolling chairs can mark a surface that has not cured sufficiently.
Professionals provide a clear return-to-use schedule based on the exact finish system and indoor conditions. Homeowners know when light foot traffic, furniture, pets, rugs, and routine cleaning can safely return. Furniture is lifted rather than dragged, and protective pads are used where appropriate.
Mistake 12: Forgetting About Household Planning
A refinishing project affects more than the floor. Rooms may be unavailable, furniture needs storage, and products may require controlled ventilation.
DIYers sometimes begin sanding before deciding where furniture will go or how family members and pets will move through the home. They may block the only exit during staining or discover that the heating and cooling system is spreading dust.
A professional plan covers room access, containment, ventilation, furniture, product timing, and the order in which spaces are completed. Clear expectations reduce surprises and protect freshly finished areas from accidental traffic.
When a DIY Touch-Up May Be Reasonable
Not every floor concern requires full professional refinishing. A capable homeowner may be able to handle gentle cleaning, approved maintenance products, furniture-pad replacement, or a small touch-up recommended by the flooring or finish manufacturer.
A professional screen-and-recoat may also be an option when the finish is worn but deep sanding is not needed. This process lightly abrades the existing coating and adds a compatible new coat. It will not remove deep scratches, major stains, or color variation, but it may renew protection when the floor is otherwise in good condition.
The important distinction is between maintaining a finish and fully removing it. Once a project involves heavy sanding, widespread color change, board repair, moisture concerns, stairs, or several connected rooms, professional help usually offers better control.
Questions to Ask Before Refinishing Hardwood Yourself
Before renting equipment or buying stain, ask:
Do I know whether the floor is solid or engineered hardwood?
Is there enough usable wood for another full sanding?
Are any boards loose, soft, stained, split, or water-damaged?
Can I identify the existing finish or confirm how it needs to be removed?
Can I control dust across the work area and adjoining rooms?
Do I understand the required sanding sequence?
Have I tested the stain on the actual floor?
Are all stain, sealer, and finish products compatible?
Can the room remain out of use for the full curing period?
Am I prepared to correct sanding marks if they appear?
A “no” does not mean the floor cannot be renewed. It means the project deserves a closer assessment before irreversible work begins.
Protect the Character and Value of Your Hardwood Floors
DIY refinishing can look appealing because the visible steps seem simple: sand, stain, and finish. The quality of the result, however, depends on dozens of smaller decisions made before and between those steps.
Professionals avoid common mistakes by assessing the floor first, completing repairs, choosing the correct sanding sequence, managing dust, testing color, using compatible products, and respecting drying and curing requirements. That process protects both the appearance of the floor and the amount of wood available for future care.
Brücke Flooring brings honest communication, careful workmanship, and a no-nonsense approach to hardwood projects throughout Tulsa. When your floor needs more than a light maintenance treatment, we are here to help you understand the options and choose a practical refinishing plan.


