

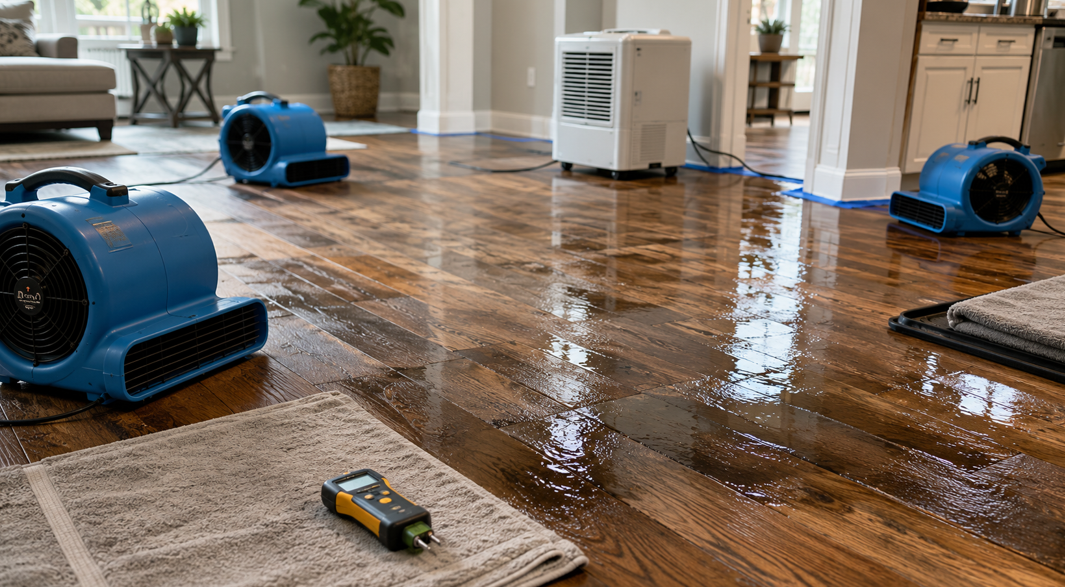
Water on the floor can spread farther than it first appears. A leaking appliance, burst pipe, overflowing fixture, roof leak, or storm can send moisture beneath flooring, into underlayment, along baseboards, and down into the subfloor. Even when the visible puddle is small, the materials below may still be holding water.
The first goal is not to make the floor look dry as quickly as possible. It is to protect everyone in the home, stop additional water from entering, and reduce further damage while waiting for a professional assessment. Fast action helps, but the wrong action can trap moisture, spread contamination, or damage flooring that might otherwise be repairable.
At Brücke Flooring, we believe homeowners deserve clear guidance during unexpected flooring problems. This practical guide explains what Tulsa homeowners can safely do before professional restoration begins, what warning signs deserve immediate attention, and which common drying methods are better left alone.
Put Safety First Before Touching the Water
Before moving furniture or reaching for towels, pause and look for immediate hazards. Water damage can involve electricity, contaminated water, weakened materials, and slippery surfaces.
Stop the Source When It Is Safe
If the water is coming from a supply line, appliance hose, sink, toilet tank, or plumbing fixture, turn off the nearest shutoff valve. When the source is unclear, the home’s main water supply may need to be turned off until a plumber can inspect the problem.
For roof leaks or stormwater, avoid climbing onto a wet roof or entering a room with a sagging ceiling. Waterlogged ceiling materials can fall without much warning. A temporary bucket or container may help catch a drip from a safe distance, but exterior repairs are best handled by a qualified professional.
Check for Electrical Risks
Do not step into standing water when outlets, extension cords, power strips, appliances, or exposed wiring are nearby. If the breaker panel can be reached without crossing the wet area, power to the affected room can be switched off. When there is any uncertainty, leave the area and contact an electrician or emergency service provider.
Never use a standard household vacuum on wet flooring. It is not designed to collect liquids and can create a serious electrical hazard.
Consider Where the Water Came From
Water from a clean supply pipe is different from sewage, a drain backup, floodwater, or water that has passed through contaminated areas. Avoid direct contact with water from toilets, drains, exterior flooding, or an unknown source. Keep children and pets away and close off the room until trained professionals arrive.
Even water that began clean can pick up contaminants as it moves through flooring, wall cavities, insulation, and other materials. When the source is uncertain, a cautious approach protects both the household and the rest of the property.
Document the Condition Before Cleanup Changes the Scene
Once the area is safe, take photographs and video before removing too much water or moving large items. A clear record can support insurance conversations, restoration planning, and decisions about repair or replacement.
Start with wide photographs showing the entire room. Then capture closer views of the water source, visible puddles, damaged flooring, wet baseboards, affected walls, cabinets, door trim, and nearby furniture. Photograph any buckling, cupping, swelling, staining, separation, or raised seams.
Write down a few basic details:
When the water was first noticed
When the source was stopped
Which rooms or adjoining spaces were affected
Whether the water reached walls, cabinets, closets, or hallways
What cleanup steps were taken
Which items were moved or removed
Water often travels beyond the most obvious wet area. Check nearby closets, thresholds, floor vents, and rooms on the level below. If moisture reached a wall, look at the opposite side as well.
Avoid throwing away damaged flooring, trim, rugs, or personal items until the insurer or restoration professional explains what documentation may be needed. When something creates a health or safety concern, photograph it carefully before removal.
This documentation does not need to delay urgent water control. A few organized photographs and notes can make the next steps much clearer and help professionals understand how the incident developed.
Remove Standing Water Gently
When the water came from a clean source and there are no electrical concerns, removing standing water can limit how much moisture penetrates the floor system.
Start With Towels, Mops, or Absorbent Pads
For a small spill or shallow water, use clean towels, mops, or absorbent pads. Press and lift rather than scrubbing aggressively, especially on hardwood or finished surfaces. Replace soaked materials regularly so the water is being removed rather than pushed into a wider area.
A wet-dry vacuum can help with a larger amount of clean water, provided the equipment is rated for liquid pickup and the area is electrically safe. Follow the manufacturer’s operating instructions and empty the tank before it becomes too full.
Move Rugs and Light Furniture
Rugs, mats, pet beds, and fabric items can hold moisture against the floor. Move them to a separate drying area as soon as it is safe. Lift light furniture rather than dragging it, since wet floors can scratch more easily and furniture legs may leave stains.
For furniture that cannot be removed, place foil, plastic tabs, or non-staining blocks beneath the legs. Avoid using printed paper or dyed fabric, which may transfer color onto damp flooring.
Large appliances, cabinets, and heavy furniture are better left to professionals. Wet materials can be unstable, and moving heavy items across a slippery surface can cause injury or additional damage.
Leave Attached Flooring in Place
It may be tempting to pry up planks, remove tile, or pull off baseboards immediately. Unplanned removal can break reusable materials, expose sharp fasteners, disturb contaminated areas, or make the damage harder to assess.
A restoration professional can determine whether selective removal is needed to release trapped moisture. That decision depends on the flooring material, installation method, water source, and condition of the subfloor.
Control Airflow and Indoor Humidity
Drying is most effective when moisture can move out of materials and into controlled air. Tulsa’s humid conditions can slow natural drying, so simply opening a window may not help.
Use Fans Only When Conditions Are Clean and Safe
Portable fans can improve air movement after clean-water damage. Aim airflow across the wet surface and through the room rather than directly into wall cavities.
Avoid fans when sewage, floodwater, visible mold, or unknown contamination is involved. Strong airflow can spread particles into areas that were not affected. In those situations, close the room and wait for professional containment and cleaning.
Run a Dehumidifier
A dehumidifier can pull moisture from the air and support evaporation. Keep exterior doors and windows closed while it operates so the unit is not constantly processing humid outdoor air. Empty the collection tank regularly or use a suitable drainage setup if the appliance allows it.
A household dehumidifier can support early drying, but it cannot confirm whether water remains under the floor. Restoration professionals use moisture meters and commercial equipment to track conditions below the surface and within surrounding materials.
Keep Temperatures Steady
Extreme heat can dry the top of a floor faster than the material underneath. That uneven drying may contribute to movement, finish damage, or distortion. Use the home’s normal climate control when it is safe and working.
Avoid heat guns, hair dryers, space heaters, or other concentrated heat sources. A steady, controlled environment is more helpful than trying to force the floor dry in a few hours.
For hidden moisture, professional water damage restoration provides the testing and equipment needed to understand what is happening below the visible surface.
Adjust the Drying Approach to the Flooring Type
Flooring materials respond to water in different ways. The right early response protects the surface while allowing professionals to evaluate the layers beneath it.
Hardwood Flooring
Hardwood can absorb moisture through the finish, seams, edges, and underside. As the moisture content changes, boards may cup, crown, swell, gap, lift, or darken. These changes do not automatically mean the entire floor needs replacement.
Remove surface water, maintain safe airflow, and leave sanding or refinishing until the wood has been properly tested and dried. Sanding too soon can create an uneven surface after the boards continue to change shape.
Moisture readings are especially important with hardwood. The top can feel dry while the subfloor remains damp. Depending on the extent of the damage, controlled drying may preserve much of the existing floor.
Laminate Flooring
Laminate has a durable wear layer, but many products contain a fiber-based core that can swell when water enters seams or reaches the underside. Raised joints, soft areas, edge swelling, or separation may indicate damage below the surface.
Wipe up clean water promptly and remove wet rugs. Avoid steam, excessive cleaning solution, and concentrated heat. Once the core has expanded, it may not return to its original shape, although targeted replacement may be possible in some installations.
Luxury Vinyl and Waterproof Flooring
Many luxury vinyl and waterproof products resist everyday spills, but water can still travel through perimeter gaps, transitions, damaged seams, or edges near cabinets and walls. It may also become trapped beneath floating planks.
Dry the surface and inspect thresholds, baseboards, floor vents, cabinets, and adjoining rooms. A floor that looks unchanged from above can still have wet underlayment or subflooring below.
Tile and Natural Stone
Ceramic tile, porcelain tile, and natural stone often tolerate surface water well. However, grout lines, cracks, perimeter joints, and the materials below the tile may allow moisture to travel.
Remove standing water and watch for loose tiles, hollow sounds, staining, cracked grout, or persistent dampness. Avoid harsh or acidic cleaners, particularly on natural stone, because they can damage the finish.
Avoid Drying Methods That Can Make Damage Worse
A quick response is valuable, but aggressive DIY methods can hide moisture or reduce the chance of a clean repair.
Do Not Rely on Touch Alone
A surface can feel dry while water remains beneath planks, underlayment, tile backer, adhesive, or subflooring. Touch and appearance are useful clues, but they do not show the full moisture pattern.
Professional moisture meters help compare affected materials with dry areas of the home. Repeated readings also show whether the drying plan is working.
Avoid Bleach as a Universal Fix
Bleach is not a complete solution for water-damaged flooring. It may discolor finishes, harm certain materials, create strong fumes, and fail to reach moisture below the surface. Cleaning products and antimicrobial treatments need to match the water source and the material involved.
Do Not Cover the Floor Too Soon
Avoid replacing rugs, stacking boxes, laying plastic sheeting, or moving furniture back before drying has been verified. Coverings can slow evaporation and trap moisture against the floor.
Leave Sanding, Sealing, and Refinishing Until Later
Applying finish or sealant over damp wood can trap moisture. Sanding a floor while boards are swollen or cupped can also remove too much material from raised areas. Once the floor reaches stable moisture levels, a flooring professional can evaluate whether refinishing is appropriate.
Do Not Ignore a Small Wet Area
Water follows seams, low points, and porous materials. A small visible patch may extend beneath cabinets, walls, or flooring into a much larger area. Early evaluation often provides more repair options and a clearer understanding of the damage.
Know When Professional Help Is Urgent
Some water incidents deserve immediate professional attention rather than a wait-and-see approach.
Call for help promptly when:
The water came from sewage, a drain backup, exterior flooding, or an unknown source
Standing water is near outlets, wiring, appliances, or the breaker panel
More than one room or floor level is affected
The floor feels soft, unstable, or unusually springy
Hardwood is lifting, buckling, or separating
Laminate seams are swollen or raised
Baseboards, drywall, cabinets, or insulation are wet
A strong or unusual odor develops
The water may have been present for an extended or unknown period
Someone in the home has respiratory concerns or a weakened immune system
The source cannot be found or stopped
Professional help is also useful when the visible floor appears normal but water may have reached underneath. A restoration team can inspect the flooring, subfloor, wall edges, transitions, and adjoining spaces instead of focusing only on the obvious puddle.
Fast action does not mean rushing into demolition. It means getting reliable information early enough to select a drying and repair plan that protects the home.
What to Expect During a Professional Floor Assessment
A thorough assessment helps determine what can be dried, repaired, refinished, or replaced.
Moisture Mapping
The team may take readings across the affected room and compare them with dry areas. This helps identify how far the water traveled and which materials are still holding moisture.
Review of Materials and Installation
Flooring professionals may identify the floor type, subfloor material, installation method, finish, adhesives, transitions, and moisture barriers. Floating floors, glued floors, nailed hardwood, and tile assemblies each require a different approach.
Controlled Drying
Commercial air movers and dehumidifiers create consistent airflow and humidity control. Equipment placement can be adjusted as readings change, allowing the drying process to follow measured conditions rather than guesswork.
Selective Removal
In some situations, baseboards, toe kicks, underlayment, or a limited number of planks may need to be removed. Selective work can provide access to trapped moisture without disturbing more of the room than necessary.
Repair and Finish Planning
After drying, the flooring professional can evaluate permanent changes such as staining, cupping, loose boards, damaged seams, or finish failure. Hardwood may be suitable for repair and refinishing. Laminate, luxury vinyl, tile, or stone may need targeted replacement where materials have permanently changed.
A clear plan also explains the sequence of work, expected disruption, and which decisions can wait until the floor reaches stable moisture levels.
Protect Your Tulsa Home With a Calm, Informed Response
Water-damaged flooring can feel alarming, but the first steps are manageable. Protect everyone in the home, stop the source when it is safe, document the condition, remove clean surface water gently, control indoor humidity, and avoid aggressive drying methods.
The moisture you cannot see often matters most. Hardwood, laminate, luxury vinyl, waterproof flooring, tile, and natural stone can all conceal water beneath the finished surface. Professional testing removes uncertainty and helps prevent repairs from beginning before the structure is ready.
Brücke Flooring brings careful workmanship, honest communication, and a White Glove Treatment approach to flooring restoration and repair in Tulsa. When water affects your floors, reach out to us for a clear assessment and a practical plan designed around your home.


